hi everyone its been a while since i posted something new in my blog been busy with college stuff must graduate on time *O*! so yeah this post is about fake Etude house product i got this fake bb cream '-' yeah sucks i thought that buying a class a korean bb cream would be worth it :\ ITS NOT first of all to clarify things THERE IS NO SUCH THING AS SG AUTHENTIC BEAUTY PRODUCTS many online shops always use the word SG authentic its not authentic its FAKE ... F. A . K .E its not worth it. ill show you guys how to spot fake etude house bb cream :|
This is the original one *picture source from google* a normal bb cream like this one costs around 800php on their shop but on online stores they only sell this for 300 200 php its VERY CHEAP and you would likely to be encouraged to buy one of this because its cheap the first sign of a fake etude house product is the CHEAP PRICE a high end products is very costly you pay alot for a nice bb cream right? basically cheap=low end expensive= high end.
The Packaging
you will know right away if its legit or not the box of an original bb cream has no decorations and such its only a rectangular box. the design on the bottle is VERY different the design and labeling on fake etude house can be easily scractched away.
The Pump
This is one of the major difference i can found among legit and non legit bb cream the legit ones is more circular and has soft edges but the fake ones has sharp edges also the fake one is very hard to pump i mean the product wont come out easily it takes 2-3 pumps for it to come out
The Design/Logo
Its very evident here in the picture as you can see the BB design of the original has this sparkle on the middle? the fake has none and the characters on the logo is korean for the fake english for the original on closer inspection the design is very different and guys Etude house All day strong BB cream is discontinued** so any bb cream like this is automatically fake since they dont produce em anymore
Product description
the left one is the legit its description is short and has this box thinngy below the fake has longer description compared to the legit one also has this recycle icon xD yeah some other stuff
Consistency & coverage
above was a sample of fake etude house bb cream swatch its WATERY and has this weird smell it has NO COVERAGE AT ALL :| when i applied this on my face it easily fades off UGH and gets VERY OILY D:
GUYS DO NOT BUY CHEAP SG AUTHENTIC SO CALLED PRODUCTS
Hi guys :O i will now show you how to edit your cosplay photos using PS my PS ic c6 so yeah XD le bf installed this on my laptop i just started using PS since i have it on my laptop why not use it for my photos :O
Curves: go to image>adjustments>curves you will see an inclined line the lower left one where the line starts adjust it a little downward and on the middle adjust it upward it will make your photo much clearer and defines * o *
Clone Stamp : use this tool to cover up blemishes and such. press ALT to the place where you want to clone and also set the opacity to 30%-40%
Dodge: i use this tool to highlight my face also for the eyes when highlighting your face set it to MIDTONE and opacity at 15-20% when using it for the eyes set it as HIGHLIGHT and opacity to 70-100% and highlight those eyes to make them POP~
Burn: use this tool to make your eyeliner visible thus making your eyes more defined~ set it to either midtones or shadow 20% opacity
Surface Blur: go to Filter>blur>surface blur it gives you this soft look its really good when your editing your skin it will give this dewy soft look make your skin look very smooooth ~
Liquify: use to adjust minor things i dont use this thing its very hard to control Q_Q
hi belated happy fathers day to all daddies out there B) i celebrated fathers day with my dad *OBVIOUSLY* XD so wasnt able to update my blog and before we head out i accidentally dropped my new blusher/countour pact i open it and OMG ITS RUINED NOOOOOOOOOOOOOOOOO '-'
then i remember i saw this posts about how to fix broken blusher so i tried em out O:
Thing You will need
Rubbing Alcohol
spoon
a plastic bag
your broken powder pieces
Steps by Step guide~
first take your broken powder pieces and put them in a plastic bag
crush the powder piece till its pulverized well
put back your powder in your compact
add rubbing alcohol and stir till it becomes a paste
using the spoon smooth out the paste to desire look LOL
let it open for it to dry
NOTE: do not use water since water takes time to dry up we used alcohol since its VOLATILE: dries up easily*
Hi! so im a little bored this afternoon decided to do an elsa snowqueen eye make up * o* so frozen is very mainstream at the moment here there are many elsa cosplayers why not try her eye make up? im really bored so yeah made a tutorial of it sorry for the crappy tutorial ;-;
used only 3 shadows for this tutorial as seen above btw i used my coastal scents 252 palette for this :> if you wanna see my pallete click here~ and as for the lenses that i used refer here~ so here is the simple sterp by step pictures sorry grabbed the models eyes from google AHHA XD
here is the step by step application of the eye shadow byw be sure to blend em well :3 also prime prime prime those lids for much intense eyeshadow color also for it to lasts longer
step by step tutorial in words AHAHAHA
prime your eyelids for better intense shadow color
grab your favorite eyeshadow brush dab a glitter plum color on your paletter and apply in the middle of your eye lids
dab your brush on a dark violet glittery shadow and apply on the sides of the plum one
get your peach color *i think* XD and apply em to the edges of your dark violet shadow and also down to your lower lid
line those eye for much more dramatic look like elsa's
use a huge amount of mascara for your lashes
grab your thick falsies and glue em to your lids
cover the excess glue with eyeliner
AND ITS DONE <3
ill provide you a nice video of an elsa tutorial just in case
as for the lashes i used this one
the bottom ones the dramatic ones since elsa's eyes have this dramatic eyelashes very thick indeed :like:
Hi im going to review this lens which i got from gwyshop :D ill give the shop link below :D bought it last year since i dont have a blog back then i didnt have the chance to review this lens. i bought this for one for my stocking anarchy cosplay . i debuted my stocking anarchy back at october 6th 2013 it was cosmania 13" back then i picked up this lens at their booth :>
since it was a very long time ago i dispatched my bottle already X( so ill provide you some pictures from google of the vial *credits to the owners*
this is the vial of the lens ill provide the specification below~
✿ ULA Blue ✿
Brand: Crystal
Diameter: 15mm
Orgin:South Korea
Effect: up to 18mm
Power: Plano Only
Base Curve: 8.6
Color: 2 Tone
Water Content: 42%
Life Span:1 Year
Shelf Life: 3 Years
FIRST IMPRESSION
IT PALE im like gosh would this thing be visible on cameras and such Q_Q i wore this on the spot and gave me red eyes lol because i didnt wash my hand XD too many people using le bathroom so put this on inside the con its hard D: almost dropped this on the ground ROLF so yeah its pale when u first look at it sorry for the crappy photo i dont have this DSLR thing *too expensive*
WHEN WORN:
IAM SHOCKED AND IMPRESSED how this thing is very visible this photo is taken the night before ozine 13" with artificial lights i did not use any flash or so i hate flash it makes my face look oily and stuff XD so yeah its very pretty O_O and very visible indeed !
this is the picture of it in a shoot *credits to le photog mr kuroyuki* :D i have no problems regarding this lens but i do get dizzy when it dries up on my eyes when wearing it for too long it makes me dizzy Q__Q
Final Verdict
this is one of my favorite lenses of all time very affordable bought this at 300php :like: visible and its not that big that will make me look liek some alien HOHO xD will repurchase?
YES if this one expires will get a new pair of it my all time favorite lens <3 SHOP LINK LINK~
Every Girl goes through A lot of beauty products especially the face to keep em from blemishes and other face related problem but many of us dont know the proper order of such products. there are many products used in our face, such as toner,moisturizer,facial foam and etc etc TheProper Order of Facial Products is from LIGHT TO HEAVY
Wash Your Face with a Facial Cleanser/Foam
Use a nice facial cleanser to cleanse up your skin also pick a mild one since our face is very delicate not to mention if you are acne prone get a facial cleanser with anti bacterial agent to reduce ace/pimple breakout since acne/pimple comes from dirt and oil that accumulated on your skin.
Exfoliate with Facial Scrub
Next is Use a scrub you shoulf only use a facial scrub 2 to 3 times a week only too much is also bad for you using facial scrub will scrub away dead skin cells on your face thus showing a much healthier looking skin
Tone that Face baby~!
use a toner Without ALCOHOL if you are picky with toner you should know alcohol is a big NO NO for a nice toner not only it harms your skin it also gives you painful stings in your face toning your face removes residues from your cleanser make up and also oil in your face.
Astringent All the way~~
one of the most important on your face regime this product is often not used but people doesnt knwo its importance Astringent is used to shrink those pores of yours the word ASTRINGENT means to shrink refer to this link link~ it is advised for oily pipz LIKE ME to use this baby since it shrinks pores thus minimizing secretion of oil in your face :3
moisturize
one of the misconception of the people is if you have OILY SKIN you dont have to moisturize your face well NO. even though you are very oily and feel that its no use to moisture that is wrong girl. Oily people should moisturize to they act as barrier against dry skin. no one want FALKY DRY SKIN RIGHT? also these keeps your away from early wrinkles :O it helps you to fight futher damage caused by the enviroment
Apply Sunscreen
in a tropical country which iam currently living .. you need this product to keep your face fair here in the ph the temperature is whooping 39 degrees celcius in the summer WHEW. it will sure to tan up your face D: sunscreen is good since it protects you from UV rays there are 2 types of radiation which sun gives you UVA and UVB. refer to the link link ~ there are suncreen that only provides protection against UVB but not on UVA you should get a sunscreen that offers BROAD SPECTRUM or FULL SPECTRUM it protects you both againsts UVA and UVB :3
THANKS FOR READING PLEASE SUBSCRIBE AND VISIT AGAIN
Lets talk about brushes! brushes is one of the must haves of every cosplayers not only us but the other girls that loves make up. thought everyone *almost* uses it dont have any idea where and how to use each brush. there is a different sizes of brush for your types of need :D it can be either for eyes lips for powder or for concealer every brush has its use and you should know how and where to use it for you to achieve your disired look and also not waste money i mean REALLY YOU BOUGHT AWESUM AWESUM BRUSHA BUT U DONT KNOW HOW TO USE EM -table flip-
so here is the list of brushes and their use and a bonus video to help you out :)
Flat Brush
This brush, typically synthetic, is used to apply foundation. It’s perfect for blending together product, covering your pores and leaving you with a streak-free, even complexion – the perfect base for any makeup look you hope to create. Usually called Buffing brush it is used in a circular motion on applying foundation there is also called Flat foundation brush also used for foundation
Powder Brush
This fluffy, rounded brush is your go-to brush for applying all face powders – bronzers, blushes and highlighters. Setting your foundation is also important and with this brush you’ll be able to evenly distribute powder to set your base. I can’t deny that this brush may become your new best friend!
Angled Brush
This fluffy angled brush is used to apply powder to your face as well, but its long bristles are great for creating dimension without irritating skin or disturbing foundation. Dust on blush or bronzer to help contour your face for a more defined (and rosy) finish.
Short Firm Brush
Ideal for applying eyeshadow, this brush can be used in the corner of the eye and along the lid. These brushes tend to have soft bristles, meaning they work best with powder eyeshadows. Similar to the angled face brush, this gem contours the eye and adds depth. If there is one eyeshadow brush you should own, this is the one.
Angled Eyeliner Brush
With all of the types of eyeliner on the market, you may not be a cream or gel liner girl; but if you are, the right brush can work wonders. This brush’s short, firm bristles provide control when trying to create a breathtaking cat eye and bonds together for fluid lash line application
Lip Brush
With a precision flat tip and firm bristles, this brush works with any lip formula and gives your pout the finish it deserves–no bleeding, even coverage and rich color. You can start by lining your lips, then work from the center of your lip to the edges, filling in your lipstick in with this brush. If you have problems connecting your color in the corner of your lips, use the blunt tip of this brush to blend product. Hello gorgeous lips!
How to Clean and take care of your brushies
when cleaning your brush you should pick a mild anti bacterial cleansing agent for your babies. since its bristles are very delicate avoid using blower to dry them up it will damage your brush also after cleaning them you should shape them back to their shape to prolong the shape of the brush if you dont handle its bristle well it will spread up just like hair with LOTS OF FRIZZ you dont want that DONT YOU? put them in a place with good ventilation for them to dry up never on direct sunlight brushes used for liquid stuff is to be cleaned after use so bacteria wont hid inside your brushie *ewww* as for powder brushes once a week bathing for your lovelies is great <3
THANKS FOR READING :"3 and credits to michelle phan** for the brushes info i will research more on other brush and update this post*
Hello Guys sharing some tips for cosplay make up :D tips and tricks and must do's for a perf cosplay make up :) lets get started.
Improve Eyeliner skils
You should take time to practice your eyeliner skill it will greatly enhance your eyes it will define your eyes well and can make it more noticeable dramatic and so also use a nice eyeliner .. it should be water/sweatproof and very pigmented my eyeliner right now is not that pigmented going to but a new one soon to replace it also make sure to line also your lower lid and tightline
Tightlining
Tight lining is important it will amke your lashes look thicker if you have thin lashes above picture shows the difference of tightlining can do for you. it can be a little weird to do at first practice makes perfect . practice then you will get it sooner or later
Contour
Contour one of the must have skill when it comes to make up. im sure many of you knows angelina jolie and kim kardashian right? look at their very prominent cheek bones. it is one of the wonders contour can do for you . No money for nose lift and other surgeries? learn contour its very easy . and cheap not to mention . in contouring there are 2 types of shadow or concealer to use one is for Highlight and one is for Contour
highlight areas you want to emphasize, to pop up and contour for places you want to make look smaller and it also adds definition to the face :) ill provide you a tutorial video i found on youtube below
Gradient Lips
Gradient lips is often seen in a korean. so called ulzaangs , its is often used by coser if you can view worldcosplay.net neneko tsukasa and other famous coser do this trick its a must do for a thick lipped like me to make my lips appear smaller . since anime character have small lips :)
Circle Lenses
Seen alot of cute asian with BIG ADORABLE EYES? yes this is their secret CIRCLE LENSES~ circle lenses come in different size and colors can be very vibrant or natural looking i usually wear 15mm lenses circle lenses range from 14mm is the smallest and 20mm? i think the biggest since 22mm is a sclera lens a very LARGE lenses not to mention very expensive have you watched the movie Underworld? they used Sclera lenses there its very hard to put on and very scary xD going back to circle lenses. if picking a lens you should pic one with dark limbal rings *limbal rings are the dark ring around the iris* as your grow older they will look less pronounced .. having darker limbal rings will make you look younger! :D
Color that Brows
Color that brows~! it will make your cosplay more appropriate looking . since you have blonde hair you should have a blonde brows too XD my first cosplay was blonde i had black brows B( pretty disturbing. its very hard for me to color my brows since its very thick :c its very hard to cover up if you have thick brows like me you should try to trim it up pluck it or shave it xD to minimize your eyebrows fot you to easily cover em up~ below is the tutorial to color those brows ~
EYELASHES! <3
One of my favorite XD <3 i love lashes how they make your eyes beautiful longer lashes can me alot of difference as seen above there are various designs of lashes Japanese lashes are very cute and adorable they also have this lashes use for lower lids it provides more definition to your eyes~ Want pretty eyes? BUY AND PUT DEMN LASHES GURL~!
Optional* for girls with monolids* EYELID TAPE <3
If you are a monolid*single lids* eyelid tape is going to eb your new bestfriend when it comes to cosplay many asian have this problem but there is a solution EYE LID TAPES these are tapes that can give you Double eyelids if you have a single eye lids i can greatly enhance ones eyes ~ see the difference above? VERY DIFFERENT RIGHT? sometimes you are gunna be shocked when you see an asian coser without make up because their eyes changed yeap.. they use this stuff to make their eyes appear bigger :O
pretty freaky huh? but hell it helps alot of asians to achieve their look ~ :) if u have monolids YOU SHOULD learn how to tape does lids maam~
SO THIS IS MY COSPLAY TIPS I HOPE THIS HELPS OUT MY FELLOW COSERS OUT THERE
Hi Guys~ so im sharing you my very first sewing project :D i decided that ill sew this one since i ran out of money to pay for MTO *made to order* costumes which costs around 3000php and not that detailed @__@ guh too expensive 3000php is around .... 62 USD? i think yeah... to save money i did this by myself with the help of good ol google and some friends who also sew their costumes so here is my costume ATM *still havent finished it yet need to buy laces for the skirt*
reference picture
So i bought fabrics at a local store here. its worth 69php per yard bought 3 yards of black and red orange for 412 i think? i actually wasted alot of money XD bought too much red orange fabric since its my first time i had hard time to know how many yards do i really need UGH bough extra 2 yards of red orange for the SKIRT Q_Q
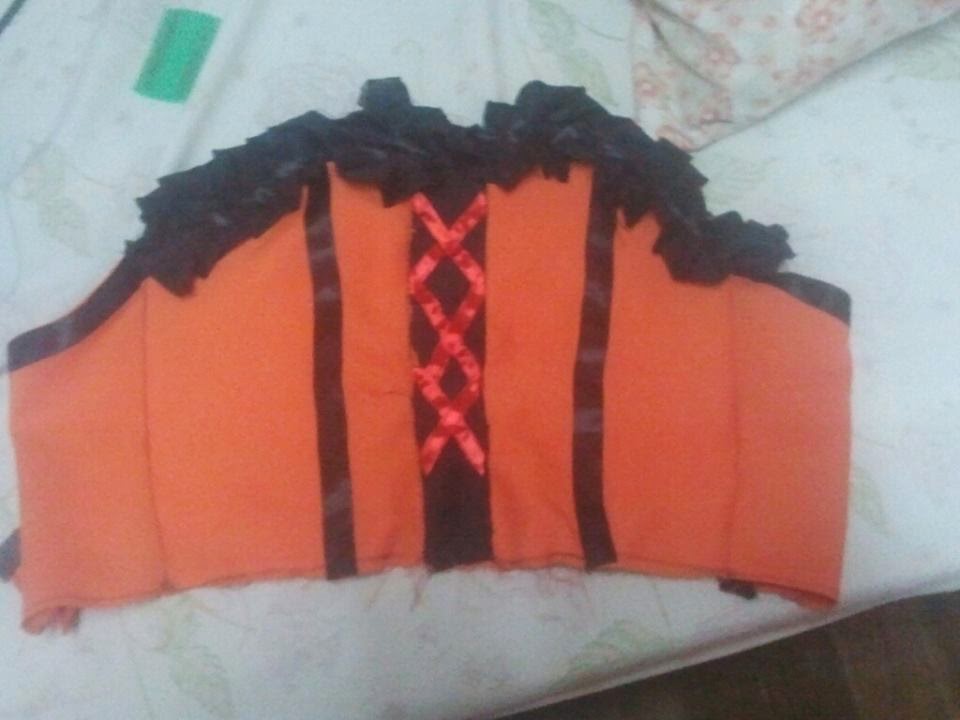
Corset Top
1st thing that i made is the corset top :D Q_Q which is the hardest part of making the costume i had a hard time fitting it in my figure it looks so straight i cant see my curves XD made a mistake on making there thanks to my friend who provided me this iam supposed to be cutting the side to put shape into my corset instead i went for the straight cut XD
after i did this my corset fits better that before it holds on to my shape not like when i first wore it xD bought 10 yards or black ribbon and 10 yards or red. bought the ribbons for the details for the costume :) and oh the back side is criss cross type i have no pics of its back side SORRY GUYS.
The Skirt and the mini apron
i got very frustrated on the skirt Q_Q since it ate up 3 yards of cloth already ran out of money -dies and i did lot of repairs and trimming here my first s work is TOO LONG so i had it cut off and 2nd is it doesn't fit me its too loose Q_Q i know i measure it right but WHY Y U GIVE ME WRONG MEASUREMENTS </3 here is how i made the circle skirt circle skirt tutorial << please click to see the tutorial by wiki how <3 so this is only the half of the skirt Q_Q went back to the store to buy another 2 yards ;3;
this is the mini apron that is need to top on before the skirt *did i said it right? lol* same procedure as the circle skirt but instead did this
sorry bout my crappy drawing i did that instead of a half circle i went for that to create the mini apron :D and on the reference it has ruffles and red ribbons iam kind of a noob when it comes to ruffle xD so i asked my friend how and she gave me this
it really helped me LIKE ALOT there is a tutorial on ruffle it involves gathering fabric i tried it . it doesnt work for my fabric *katrina fabric* so i went frustrated provided the video on gathers below :> i
you can choose which technique would you wanna go with but i went with my friends technique :D as for the red ribbons on the apron i went frustrated if iam going to sew them one by one of make holes in the apron i made the decision to sew them 1 by 1 and it went AWESUM :> i cant provide the picture of it i cant find it Q_Q
Accessories
the arm warmer and the headdress :D i had a hard time on the headress its crappy xD
I MEAN LOOK AT IT XD its all messed up XD but hell yeah they cant see it anyway so went on with this HURHURHUR :))) and as for the arm warmers i followed this pattern online
after cutting this i measured 4 inches of black and 5 inches of red orange for the detail *please check the reference above* it went nice except for the ribbons its hard to sew them xD on but it went great :D i did not get pictures of the choker its very easy get a ribbon and cut black fabric and make a ruffle LE POOF done~
just me wearing the headdress that i made YAY guys i suggest making your own costume you will feel crappy cuz you cant do it right but after you sew your cos you will feel fulfilled VERY fulfilled since you poured your heart into it and work very hard i even went all night to do this and learn to love my costumes more since its very hard to make them :D if you have any questions regarding this costume/tutorial id be happy to help you out ill be updating this after i get an awesome shot for my costume